
Windows Setup Guide
Step 1: Downloading the Ship of Harkinian
Note: This is the code that will interact with the Assets required in Step 2. This does NOT provide you with any Nintendo Licensed Assets…
Click here to go to the releases page on GitHub, where you will find the links for all latest versions of Ship of Harkinian. Find and click the link that has Windows in the name.
Extract the Zip file into a Folder on your Local Hard Drive for later.
Note: Do NOT just open the zip and run SoH from there, things will break.
Note: Do NOT extract this to C:\Windows, C:\Program Files, or a cloud drive location, things will break.
Step 2: Obtaining a ROM (Legally)
Follow the steps outlined in ROM Dumping Guide to legally obtain a usable ROM for the Ship of Harkinian.
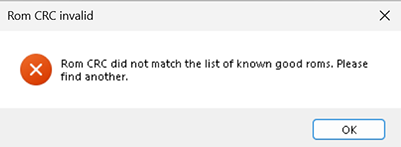
The ReadMe file included with the download mentioned in Step 1 lists out the CRC/SHA1 Hash and a website to verify your version. Incorrect versions are not supported and you will see an error or the game will not load similar to the below screenshot:

Step 3: Extracting the Assets and Launching Ship of Harkinian
Assuming you correctly followed the instructions in Step 1 and Step 2 you are now ready for the last process.
Open the Folder you extracted from Step 1 and launch the soh.exe file.
Note: You can ignore any AntiVirus or Windows SmartScreen notifications, these are false positives due to these programs having too little information about Ship of Harkinian.
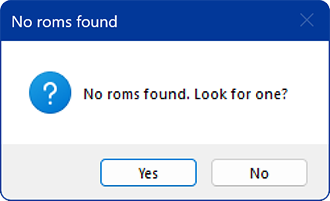
Once soh.exe has been opened for the first time you will be greeted with a popup window. Select Yes at this prompt:

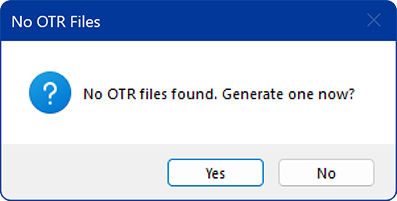
If your ROM is not located in the same folder as the SoH.exe you will have one additional prompt. Select Yes at this prompt too:

Locate the ROM that you dumped in Step 2 and double click it to begin the Asset Extraction process.
This Asset Extraction process will happen silently in the background.
Note: You can safely ignore any errors displayed during this process, as long as the console window closes and you see the following prompt:

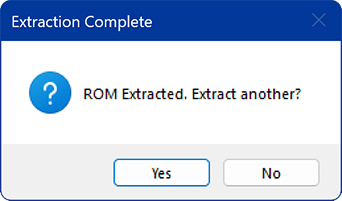
If you have a Master Quest ROM you wish to create an oot-mq.otr from, select Yes. Otherwise, select No.
Once you have completed the extraction process the Game will automatically launch.
Note: If you are performing this operation for use with a console platform, please continue on to step 3 for either Nintendo Switch or Wii U guides.
Congratulations, you can now play Ocarina of Time on the Ship of Harkinian.